2nd Workshop on Open-Vocabulary 3D Scene Understanding
Challenge Track 2: Open-vocabulary 3D functionality grounding

Overview
Tentative dates
- Submission Portal: EvalAI
- Data Instructions & Helper Scripts: April 17, 2024
- Dev Phase Start: April 17, 2024
- Submission Portal Start: April 19, 2024
- Test Phase Start: May 1, 2024
- Test Phase End: June 14, 2024 (14:00 Pacific Time)
Task description
In the second track of our workshop challenge, we propose the following challenge:
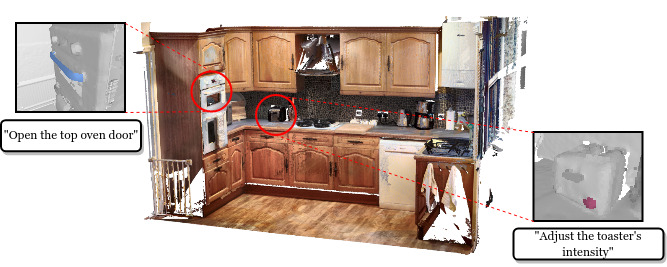
TASK: Given an open-vocabulary, text-based description of a task, the aim is to localize and segment the functional interactive elements that an agent needs to interact with to successfully accomplish the task.
INPUT: The Faro laser scan of a given scene, multiple RGB-D sequences captured with an iPad Pro, camera parameters, and a language description of a task.
OUTPUT: Instance segmentation of the point cloud that corresponds to the vertices of the provided laser scan, segmenting the functional interactive elements that the agent needs to manipulate.
Install dependencies
All the code related with this challenge track can be found in this Github repo.
Download the code repository:
git clone git@github.com:OpenSun3D/cvpr24-challenge.git
cd cvpr24-challenge/challenge_track_2
Create virtual environment:
conda create --name opensun3d_track2 python=3.8
conda activate opensun3d_track2
pip install -r requirements.txt
Data download instructions
For this challenge track, we use part of the SceneFun3D dataset.
Important Note: As the SceneFun3D dataset is built upon the ARKitScenes dataset, by following the instructions to download the data, you also agree with the license & terms and conditions of the ARKitScenes dataset, as well as the code of conduct provided in the original ARKitScenes repository.
Challenge Phases
Our challenge consists of two phases: Development Phase and Test Phase.
-
In the first phase, the Development Phase, the challenge participants can download and use the dev split for their experiments, which is based on a small subset of the Training set of the SceneFun3D dataset. From these dev scenes, we provide all the data assets and annotations for development purposes. We refer to this subset as the Challenge Development set. The participants can upload their predictions on scenes from the Challenge Development set to the Phase 1 - Development Benchmark in the submission webpage.
-
In the second phase, the Test Phase, we provide a subset of the test split of the SceneFun3D dataset. We refer to this subset as the Challenge Test set. For each of the scenes in the Challenge Test set, we provide all the data assets and input language task descriptions but we do not provide the GT annotations. The participants are expected to upload their predictions for each scene from the Challenge Test set to the Phase 2 - Test Benchmark in the submission webpage. Data for this phase is now available.
Data organization and format
We represent each scene with a visit_id (6-digit number) and each video sequence with a video_id (8-digit number). For each scene, we provide a high-resolution point cloud generated by combinding multiple Faro laser scans of the scene. Additionally, each scene is accompanied by on average three video sequences recorded with a 2020 iPad Pro.
PATH/TO/DATA/DIR/{dev or test}/
├── {visit_id}/
|   ├── {visit_id}.ply # combined Faro laser scan with 5mm resolution
|   ├── {visit_id}_crop_mask.npy # binary mask to crop extraneous points from the combined laser scan
|   ├── {video_id}/ # data assets for the video sequence with id {video_id}
|   |   ├── lowres_wide/ # RGB images of the low res. wide camera (256x192) - 60 FPS
|   |   |   ├── {video_id}_<timestamp>.png # filenames are indexed by timestamps
|   |   |   └── ...
|   |   ├── lowres_depth/ # depth maps associated with the low res. frames (256x192)
|   |   |   ├── {video_id}_<timestamp>.png # filenames are indexed by timestamps
|   |   |   └── ...
|   |   ├── lowres_wide_intrinsics/ # camera intrinsics for the low res. wide camera
|   |   |   ├── {video_id}_<timestamp>.pincam # filenames are indexed by timestamps
|   |   |   └── ...
|   |   ├── wide/ # RGB images of the wide camera (1920x1440) - 10 FPS
|   |   |   ├── {video_id}_<timestamp>.png # filenames are indexed by timestamps
|   |   |   └── ...
|   |   ├── highres_depth/ # depth maps associated with the high res. frames (1920x1440)
|   |   |   ├──{video_id}_<timestamp>.png  # filenames are indexed by timestamps
|   |   |   └── ...
|   |   ├── wide_intrinsics/ # camera intrinsics for the high res. wide camera
|   |   |   ├── {video_id}_<timestamp>.pincam # filenames are indexed by timestamps
|   |   |   └── ...
|   |   ├── lowres_wide.traj # camera trajectory, each line contains the camera pose for a timestamp
|   |   ├── {video_id}_refined_transform.npy # 4x4 transformation matrix that registers the Faro laser scan to the coordinate system of the iPad camera poses
|   |   └── {video_id}_3dod_mesh.ply # ARKit 3D mesh reconstruction of the scene
.
.
.
Annotations format
Challenge Development set
We provide GT annotations for the scenes in the development set which are organized in two separate files and follow this format:
[
  {
    "desc_id": unique id of the description,
    "visit_id": the identifier of the scene,
    "annot_id": [
      list of the associated annotation id's in the *annotations.json* file
    ],
    "description": language instruction of the task
  },
  ...
]
[
  {
    "annot_id": unique id of the annotation,
    "visit_id": the identifier of the scene,
    "indices": the mask indices of the original laser scan point cloud ({visit_id}_laser_scan.ply) that comprise the functional interactive element instance
  },
  ...
]
The file descriptions_dev.json contains the language task descriptions and links them to the corresponding functional interactive element instances. The file annotations_dev.json contains the functional interactive element annotations, i.e., the mask indices of a single functional interactive element instance in the original laser scan.
📝 We highlight that a single language task description can correspond to one or multiple functional interactive element instances.
Challenge Test set
For the scenes in the challenge test set, we provide input language task descriptions, without any functional interactive element annotations. The participants should run their models on these inputs and upload their predictions to our submission portal by following the submission instructions.
[
  {
    "desc_id": unique id of the description,
    "visit_id": the identifier of the scene,
    "description": language instruction of the task
  },
  ...
]
Data downloader
We provide a data downloader script that downloads and prepares the data.
You can run as:
python -m data_downloader.data_asset_download --split <split> --download_dir <download_dir> --download_only_one_video_sequence --dataset_assets <identifier list of data assets to download>
where the supported arguments are:
-
--split <split>: Specify the split of the data. For the Development Phase this argument can bechallenge_dev_setorsample_scene. -
--data_dir <data_dir>: Specify the path of the data -
--download_only_one_video_sequence: Specify whether to download only one video sequence (the one with the highest number of frames). -
--dataset_assets <identifier list of data assets to download>: Specify the identifier list of the data assets to download. See the table below for the supported data asset identifiers. You can specify to download the data assets to download as--dataset_assets <identifier-1> <identifier-2> ... <identifier-n>
Below you can find a list with the supported data asset identifiers. To download the desired data assets, add the corresponding identifiers after the --dataset_assets argument.
| Data asset identifier | Filename | Description |
|---|---|---|
| laser_scan_5mm | {visit_id}_laser_scan.ply | Combined Faro laser scan downsampled with a voxel size of 5mm |
| crop_mask | {visit_id}_crop_mask.npy | Binary mask to crop extraneous points from the combined laser scan |
| lowres_wide | lowres_wide/ | RGB images of the low res. wide camera (256x192) - 60 FPS |
| lowres_wide_intrinsics | lowres_wide_intrinsics/ | camera intrinsics for the low res. wide camera |
| lowres_depth | lowres_depth/ | depth maps associated with the low res. frames (256x192) |
| wide | wide/ | RGB images of the wide camera (1920x1440) - 10 FPS |
| wide_intrinsics | wide_intrinsics | camera intrinsics for the high res. wide camera |
| highres_depth | highres_depth/ | depth maps associated with the high res. frames (1920x1440) |
| camera_trajectory | lowres_wide.traj | Camera trajectory, each line contains the camera pose for a timestamp |
| vid_mov | {video_id}.mov | Video captured with the camera in .mov format |
| vid_mp4 | {video_id}.mp4 | Video captured with the camera in .mp4 format |
| mesh | {video_id}_3dod_mesh.ply | ARKit 3D mesh reconstruction of the scene |
| transform | {video_id}_refined_transform.npy | 4x4 transformation matrix that registers the Faro laser scan to the coordinate system of the iPad camera poses |
Development phase
Download the scenes in the development set
To download the scenes in the development set, you can run:
python -m data_downloader.data_asset_download --split challenge_dev_set --download_dir data/ --dataset_assets <identifier list of data assets to download>
where <identifier list of data assets to download> should be substituted with the identifiers of the data assets you want to download. For example, to download the combined laser scan, the low resolution RGB frames, depth maps and camera intrinsics, the camera trajectory and the transformation matrix, you can run:
python -m data_downloader.data_asset_download --split challenge_dev_set --download_dir data/ --dataset_assets laser_scan_5mm lowres_wide lowres_depth lowres_wide_intrinsics camera_trajectory transform
You can also add --download_only_one_video_sequence, if you want to download only one video sequence for each scene. This option will reduce the storage needed and the download time.
Download a sample scene
In case you want to download only a single sample scene and a video sequence you can run:
python -m data_downloader.data_asset_download --split sample_scene --download_dir data/ --dataset_assets <identifier list of data assets to download>
Test phase
Download the scenes in the test set
Similarly, to download the scenes in the test set, you can run:
python -m data_downloader.data_asset_download --split challenge_test_set --download_dir data/ --dataset_assets <identifier list of data assets to download>
where <identifier list of data assets to download> should be substituted with the identifiers of the data assets you want to download.
To download only one video sequence for each scene, you can add --download_only_one_video_sequence.
Data parsers
We provide data parsers and helper functions from the SceneFun3D toolkit here. Documentation can be found here.
Visualization helpers
We provide visualization helpers here.
Example code
We provide an example script on how to handle the data assets and the data parsers. This script projects the color of the iPad camera frames on the combined Faro laser scan of the scene.
You can run as
python -m example.project_color_on_laser_scan --split <split> --data_dir <data_dir> --video_id_csv <video_id_csv> --coloring_asset <coloring_asset> --crop_extraneous --save_as_float32
where the supported arguments are:
-
--split <split>: Specify the split of the data. For this challenge track this argument can bedevortest. -
--data_dir <data_dir>: Specify the path of the data -
--video_id_csv <video_id_csv>: Specify the path of the .csv file which contains the {visit_id, video_id} list -
--coloring_asset <coloring_asset>: Specify the RGB data asset to use for projecting the color to the laser scan. Can belowres_wideorwide. -
--crop_extraneous: Specify whether to crop the extraneous points from the laser scan based on thecrop_maskasset. -
--save_as_float32: Specify whether to store the output point cloud
For example, to run the script on the sample scene which you have stored under data/:
python -m example.project_color_on_laser_scan --split dev --data_dir data/ --video_id_csv benchmark_file_lists/sample_scene.csv --coloring_asset wide --crop_extraneous --save_as_float32
where the wide RGB frames are used for coloring, the extraneous point will be cropped from the laser scan and the output will be stored.
Note: To run the example script, you need first to download the necessary data assets. For example, this can be done for the sample scene as follows:
-
Case 1: Use the low res. frames for coloring
python -m data_downloader.data_asset_download --split sample_scene --download_dir data/ --dataset_assets laser_scan_5mm crop_mask transform camera_trajectory lowres_wide lowres_wide_intrinsics lowres_depth -
Case 1: Use the high res. frames for coloring
python -m data_downloader.data_asset_download --split sample_scene --download_dir data/ --dataset_assets laser_scan_5mm crop_mask transform camera_trajectory wide wide_intrinsics highres_depth
Submission Instructions
Given the open-vocabulary language task description, the participants are asked to segment functional interactive element instances that an agent needs to interact with to successfully accomplish the task. Expected result is functional interactive element masks, and confidence scores for each mask.
We ask the participants to upload their results as a single .zip file, which when unzipped must contain in the root the prediction files. There must not be any additional files or folders in the archive except those specified below.
Results must be provided as a text file for each scene. Each text file should contain a line for each instance, containing the relative path to a binary mask of the instance, and the confidence of the prediction. The result text files must be named according to the corresponding laser scan (visit_id) and language description (desc_id), as {visit_id}_{desc_id}.txt. Predicted .txt files listing the instances of each scan must live in the root of the unzipped submission. Predicted instance mask files must live in a subdirectory named predicted_masks/ of the unzipped submission. For example, a submission should look like the following:
submission_opensun3d_track2
    |__ {visit_id_1}_{desc_id_1}.txt
    |__ {visit_id_2}_{desc_id_2}.txt
         ⋮
    |__ {visit_id_N}_{desc_id_N}.txt
    |__ predicted_masks/
        |__ {visit_id_1}_{desc_id_1}_000.txt
        |__ {visit_id_1}_{desc_id_1}_001.txt
            ⋮
for all the available N pairs (laser scan, language description).
Each prediction file for a scene should contain a list of instances, where an instance is: (1) the relative path to the predicted mask file, (2) the float confidence score. If your method does not produce confidence scores, you can use 1.0 as the confidence score for all masks. Each line in the prediction file should correspond to one instance, and the two values above separated by a space. Thus, the filenames in the prediction files must not contain spaces.
The predicted instance mask file should provide a mask over the vertices of the provided laser scan, i.e. {visit_id}_laser_scan.ply, following the original order of the vertices in this file.
Each instance mask file should contain one line per point, with each line containing an integer value, with non-zero values indicating part of the instance. For example, consider a scene identified by visit_id 123456, with a language description input identified by desc_id 5baea371-b33b-4076-92b1-587a709e6c65. In this case, the submission files could look like:
123456_5baea371-b33b-4076-92b1-587a709e6c65.txt
predicted_masks/123456_5baea371-b33b-4076-92b1-587a709e6c65_000.txt 0.7234
predicted_masks/123456_5baea371-b33b-4076-92b1-587a709e6c65_001.txt 0.9038
⋮
and predicted_masks/123456_5baea371-b33b-4076-92b1-587a709e6c65_000.txt could look like:
0
0
1
1
⋮
0
📝 IMPORTANT NOTE: The prediction files must adhere to the vertex ordering of the original laser scan point cloud
{visit_id}_laser_scan.ply. If your pipeline alters this vertex ordering (e.g., through cropping the laser scan using thecrop_maskdata asset), ensure that the model predictions are re-ordered to match the original vertex ordering before generating the prediction files.
Evaluation Guidelines
In order to evaluate the results on the scenes of the dev set, we provide evaluation functions as well as an example evaluation script. We follow the standard evaluation for 3D instance segmentation, and compute Average Precision (AP) scores. The evaluation script computes the AP scores for each language task description and then averages the scores over all language task descriptions in the set.
You can run the example evaluation script as:
python -m benchmark_eval.demo_eval --pred_dir <pred_dir> --gt_dir benchmark_data/gt_development_scenes
where <pred_dir> is the directory containing the predictions. The predictions must be organized in the submission format, containing <visit_id>_<desc_id>.txt files and predicted_masks/ folder including all masks.
Contact Us
For any technical issues or questions regarding the challenge, please raise an issue on the Github repo.
For direct contact, or any concerns: email us.